Before before...
Super before - lol ! I have brown hair !!!
I also painted the floors, a few years back, with our Bluestone House™ Chalky Patina in colour "Vintage Velvet" see here ...
https://bluestonehouse.blogspot.com/2018/05/floor-painting-101.html
My nephew (an electrician) added my very cool LED pot-lights.

I adjusted them to daylight - WOW ! what a huge difference to my dark kitchen. So Bright !
Before ...
I have been wanting to redo my kitchen for years.
I finally nailed down the counter top & cabinet colours, now I just had to find the time - lol.
A kitchen reno can be a daunting task for the simple reason that its the most used room in the house.
I decided to paint it slowly, using my dinning room as the paint room.
The hardest part was deciding on colours. I painted up some large sheets of paper in my colour options and hung them in the kitchen - looked at them day & night as the colours may change depending on your lighting and time of day.
Calculating how much paint you will need.
One 473ml jar will cover approximately 50-60 sq feet - 946ml will cover 100-120 sq feet.
The average cabinet door is roughly 10-12 sq feet - both back & front.
Therefore a 946ml jar will cover approx. 5-6 doors with 2 coats.
My kitchen took 3 x 946ml jars - 2 coats
That's less than $150 including the brush !!! For my new Kitchen Cabinets.
This also depends on how you paint & colour chosen too. Some colours cover better than others.
Easy way to calculate your kitchen is by counting your floor tiles - if they are 12"x12" tiles
and base cabinets are 34-36" high . So if you have 10 feet X 3' (36") you have 30 feet X 2 for the insides
60 feet x 2 coats 120 feet - There fore 1 x 946ml jar should do your bottom cabinets.
I decided to only do a section at a time. That offered the least amount of disturbance to our regular life.
YES you can paint the doors directly on the cabinets BUT, and this is huge...
IT WILL LOOK LIKE YOU PAINTED THEM - UGH!
If you want your kitchen cabinets to look professionally done, please remove the hinges & handles.
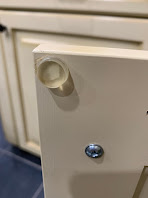
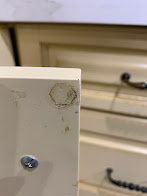
Then remove those icky gummy door stops ...
Before...


I removed as much as I could with a scraper then removed the residue with "EZ Strip" a gunk remover.
To me, this was the hardest part and my least favorite.
The new stops are felt & will not get gummy.
To start I placed a large tarp over my dining-room table & a-way we go !!!
Small leftover blocks of 2x4's were used to elevate the doors off the table, so I could paint the sides without drips.

Always begin with the back of the door.
When I removed the hardware - I placed it on the table next to the door - so I didn't mix them up.
I removed 4 doors at a time so I was sure to reinstall them in the correct place.
Then while they were drying I painted the frame of the cabinets.
Easy Steps using our Fabulous "Silky Patina " Paint*Primer*Topcoat" All-In-One !!!
- Clean the doors if they are greasy or dusty - I just use vinegar & water
- Prepare your work space - drop-cloth and riser blocks
- Remove doors & hardware.
- Lightly sand the area to paint - just enough to give it a little grit. use a hand sander or electric - fine grit sandpaper
- Brush off any dust
- apply first coat with our round 1" brush. I do the sides as well.
- While the paint is still wet, use a small lint free roller to flatten any lines or drips
- Dry-time will vary depending on humidity - usually 20 min - the longer you can wait the better.
- Second coat - I did my second coat 4 hrs later. Same steps as the first coat.
- Once the back is dry (I waited overnight to be sure) - flip the door & follow the same steps as above for the front.
- Paint the frames the same way - tape off what you don't want to touch - floor or wall etc.
LOVE LOVE LOVE MY NEW KITCHEN !!!
 |
| After - New fridge too ! |

Before
 |
| After |
 |
| Before |
- Lighting - just the pot lights - decorative lighting can be added last.
- Pick out all your options - so there is no gap in the process. countertop, hardware, taps, sink etc.
- Any carpentry changes - I cut down the bar-top behind the sink & changed the sink bump-out
- Decide on outlets - position & quantity.
- Install countertop.
- Paint Cabinets.
- Update pendants.
- Had the new fridge delivered.
- Sat at the bar & had a glass of vino while admiring my new kitchen💙
Any questions or comments please contact me at
info@bluestonehouse.ca


